Garden with Insight v1.0 Help: 3D object editor
The 3D object editor is very simple because it was thrown together quickly. It's more like a 3D object
specification interpreter, because you change the object by directly editing the written specification for the
3D object. It would be fairly difficult to make a new 3D object from scratch using this editor; you will
probably want to copy an existing 3D object and make changes to the copy.
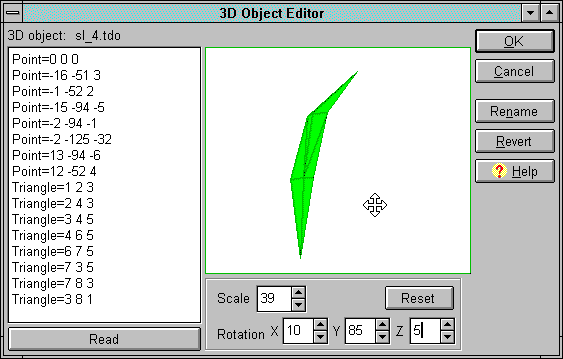
The 3D object editor appears when you click the Edit button in the 3D object chooser. The selected 3D object will appear in the picture on the
right side of the 3D object editor.

The 3D object editor
Under the drawing of the 3D object there are a few buttons that control how the object is drawn in this
window. Note that these settings do not affect how the 3D object is drawn on the plant because that
information (angle, scale) is determined when the plant is drawing. Also, every 3D object will appear
green here, even if it is a flower petal or fruit section. Its color when it is drawn on a plant will vary
according to the plant's parameters.
Scale: Click the up arrow to enlarge the 3D object and the down arrow to reduce it. The scale
ranges from 0 to 100. If the 3D object is too large for the area it is drawn in, you can 1) enlarge the
window, or 2) drag the 3D object around inside the area by clicking and dragging on the picture.
Rotation: Click the up and down arrows to change the x, y and z rotations at which to draw the
3D object. Each of these rotations has a scale from 0 to 255, which is equivalent to 360 degrees. Rotating
in the X direction alone causes the 3D object to move toward or away from you. Rotation in the Y
direction alone causes the 3D object to spin around its main axis. Rotating in the Z direction alone causes
the 3D object to lean to the left or right. These rotations build on one another, though, so you will have to
experiment with them to get the 3D object to the angle you want.
Reset: The reset button returns the scale and angle settings to defaults. (This is like the center
button on the browser right side.) If you can't see the 3D object or if it
is taking up the whole picture, click this button to center it again.
On the left side of the window is the actual text specification that determines the shape of the 3D object.
The specification is made up of a list of points, each with xyz coordinates, and a list of triangles linking
the points. The points must be in the list before the triangles, and the triangles must refer to only the
number of points listed. Try changing a few of the point values to see how it affects the 3D object. Click
the Read button to redraw the 3D object with your changes. If there is a problem reading the
specification, the program will (probably) tell you what is wrong.
When you have finished editing the 3D object, click OK to save your changes. But remember
that your changes won't be permanently saved until you save the templates file. To leave the 3D
object as it was, click Cancel. The Revert button returns the 3D object to the original
specification when you opened the window.
| 
