Garden with Insight v1.0 Help: Tool editor
Use the tool editor to change the properties of tools and to create new tools.
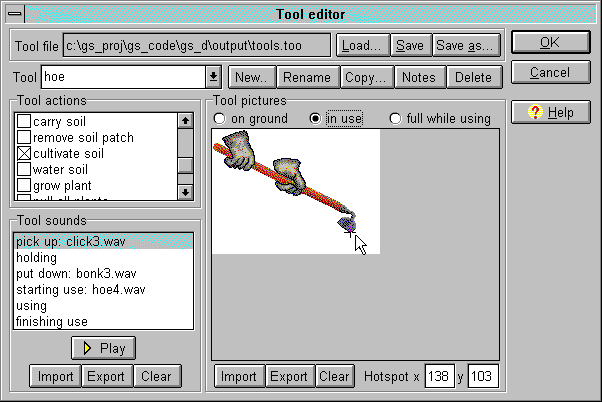
The tool editor window
Note: If you get a message saying your system resources are too low to open the
tool editor, close some other programs and try again. The tool editor will not open if the resources it
requires are unavailable.
Tool file and list of tools
At the top of the tool editor window is the name of the tool file in use. To open and use a new tool
file, click Load. To save the current tool file, click Save. To save the current tool file
with a different name, click Save as.
Note: There are some special tool files you can use; small tools (see How to make the tool pictures smaller) and 16-color tools (see How to use tools with a 16-color graphics display).
Under the tool file name is a box that shows the list of all tools in the tool file. Click on the list to see the
tools and to choose another file from the list. Next to the tool box are a few buttons that have effects on the
current tool. They are:
New: Create a new tool.
Rename: Change the name of the current tool.
Copy: Copy the current tool to create another tool just like it.
Notes: Open a notes editor on the current tool.
Delete: Delete the current tool. You can delete any tool but the glove tool.
Under the tool box are three panels that describe the current tool: the action panel, the sounds panel, and
the pictures panel.
Tool actions panel
In the tool actions panel is a list of tool actions, some of which may be checked for the current tool.
To add actions to the current tool, check them in the list; to remove actions, uncheck them. For example,
the seed packet tool has the action plant, and the pitchfork tool has the actions aerate
soil and carry mulch. Any tool can have any action. You
can even make one tool that has all the actions if you like.
Tool sounds panel
In the sounds panel you choose the sounds for each phase of using the tool. Sound phases are just
times during the use of a tool when you might want to play a sound. The sound phases are:
pick up: when you pick up the tool by right-clicking on it
holding: while you are holding the tool (the sound will play over and over)
put down: when you put down the tool by right-clicking
starting use: when you press the mouse button while holding the tool
using: while you hold down the mouse button while holding the tool (the sound will play over
and over)
finishing use: when you release the mouse button while holding the tool
For most tools you will not want all of these sounds, but you have lots of variety to design some crazy
tools.
To change the sound for any sound phase, click on the sound phase in the list box to select it. Then click
Import, or right-click on the sound phase in the list box. In the file dialog that appears, choose a
wave (.wav) sound file, then click OK. You can only import wave-type sound files. The name of
the new sound file you chose will appear in the list after the name of the sound phase.
To clear out a sound, click Clear.
To play any sound, click Play, or double-click on the sound phase in the list box.
To save any sound as a wave (.wav) sound file, click Export. In the file dialog that appears, type
a name for the sound file, then click OK.
Tool pictures panel
In the pictures panel you choose the bitmaps to show for the selected tool. Tools have three tool
picture states:
on the ground: when you are not holding the tool
in use: while you are holding the tool
full while using: while you are holding the tool and transporting a material such as soil or mulch; only tools that have the tool actions carry soil or carry
mulch need a picture for the full while using state.
To change the bitmap used for any picture state of a tool, choose the state from the three radio buttons at the top of the pictures panel, then click the
Import button at the bottom of the pictures panel and choose a bitmap (.bmp) file. To save a tool
picture as a separate bitmap, click Export. To clear a tool picture, click Clear.
Each tool must have a hotspot for each of its pictures which indicates
the precise cursor position. Put the hotspot in the same point on the tool in each state, like at the point of a
shovel or at the top right corner of a seed packet. This keeps the tool from jumping around the screen
when you pick it up and put it down.
Set the hotspot for the tool's picture for each tool state by clicking on the picture of the tool where you
want the hotspot to be; a small crosshair will appear on the bitmap at that spot, and the x,y coordinates of
the hotspot will appear at the bottom of the tool pictures panel (after the word Hotspot). You can
edit the x,y coordinates to get a more precise value. Also, to change the hotspot one pixel at a time, click
in the X or Y edit boxes after the word Hotspot, then hold down the Control key and
type one of the arrows on your keyboard. The hotspot will move one pixel in the direction of the
arrow.
Click OK to save your changes to the garden tools or Cancel to abandon them.
Remember that canceling your changes will not affect the tool file if you have already saved your changed
tools to it.
See also:
How to make a new tool
How to change a tool's actions
How to change a tool's pictures
How to change a tool's sounds
How to make the tool pictures smaller
How to use tools with a 16-color graphics display
| 